Screenshots and menu names follow JCarTools 2.0.1 beta. Menu placement may differ on narrower screens; use the section names to find each setting.
Before you start
Complete the JCarTools installation and grant the required permissions. Configure vehicle-related features only while parked, with the infotainment system switched on and the power supply stable.
- Make sure JCarTools opens without a licence error.
- Install and open the navigation or other apps you want to display on the instrument cluster.
- Change one setting at a time and check the result immediately. This makes it much easier to identify the option responsible for any unexpected behaviour.
If JCarTools is not installed yet, begin with the JCarTools installation guide. A separate USB GPS guide is also available.
1. Select the correct vehicle profile
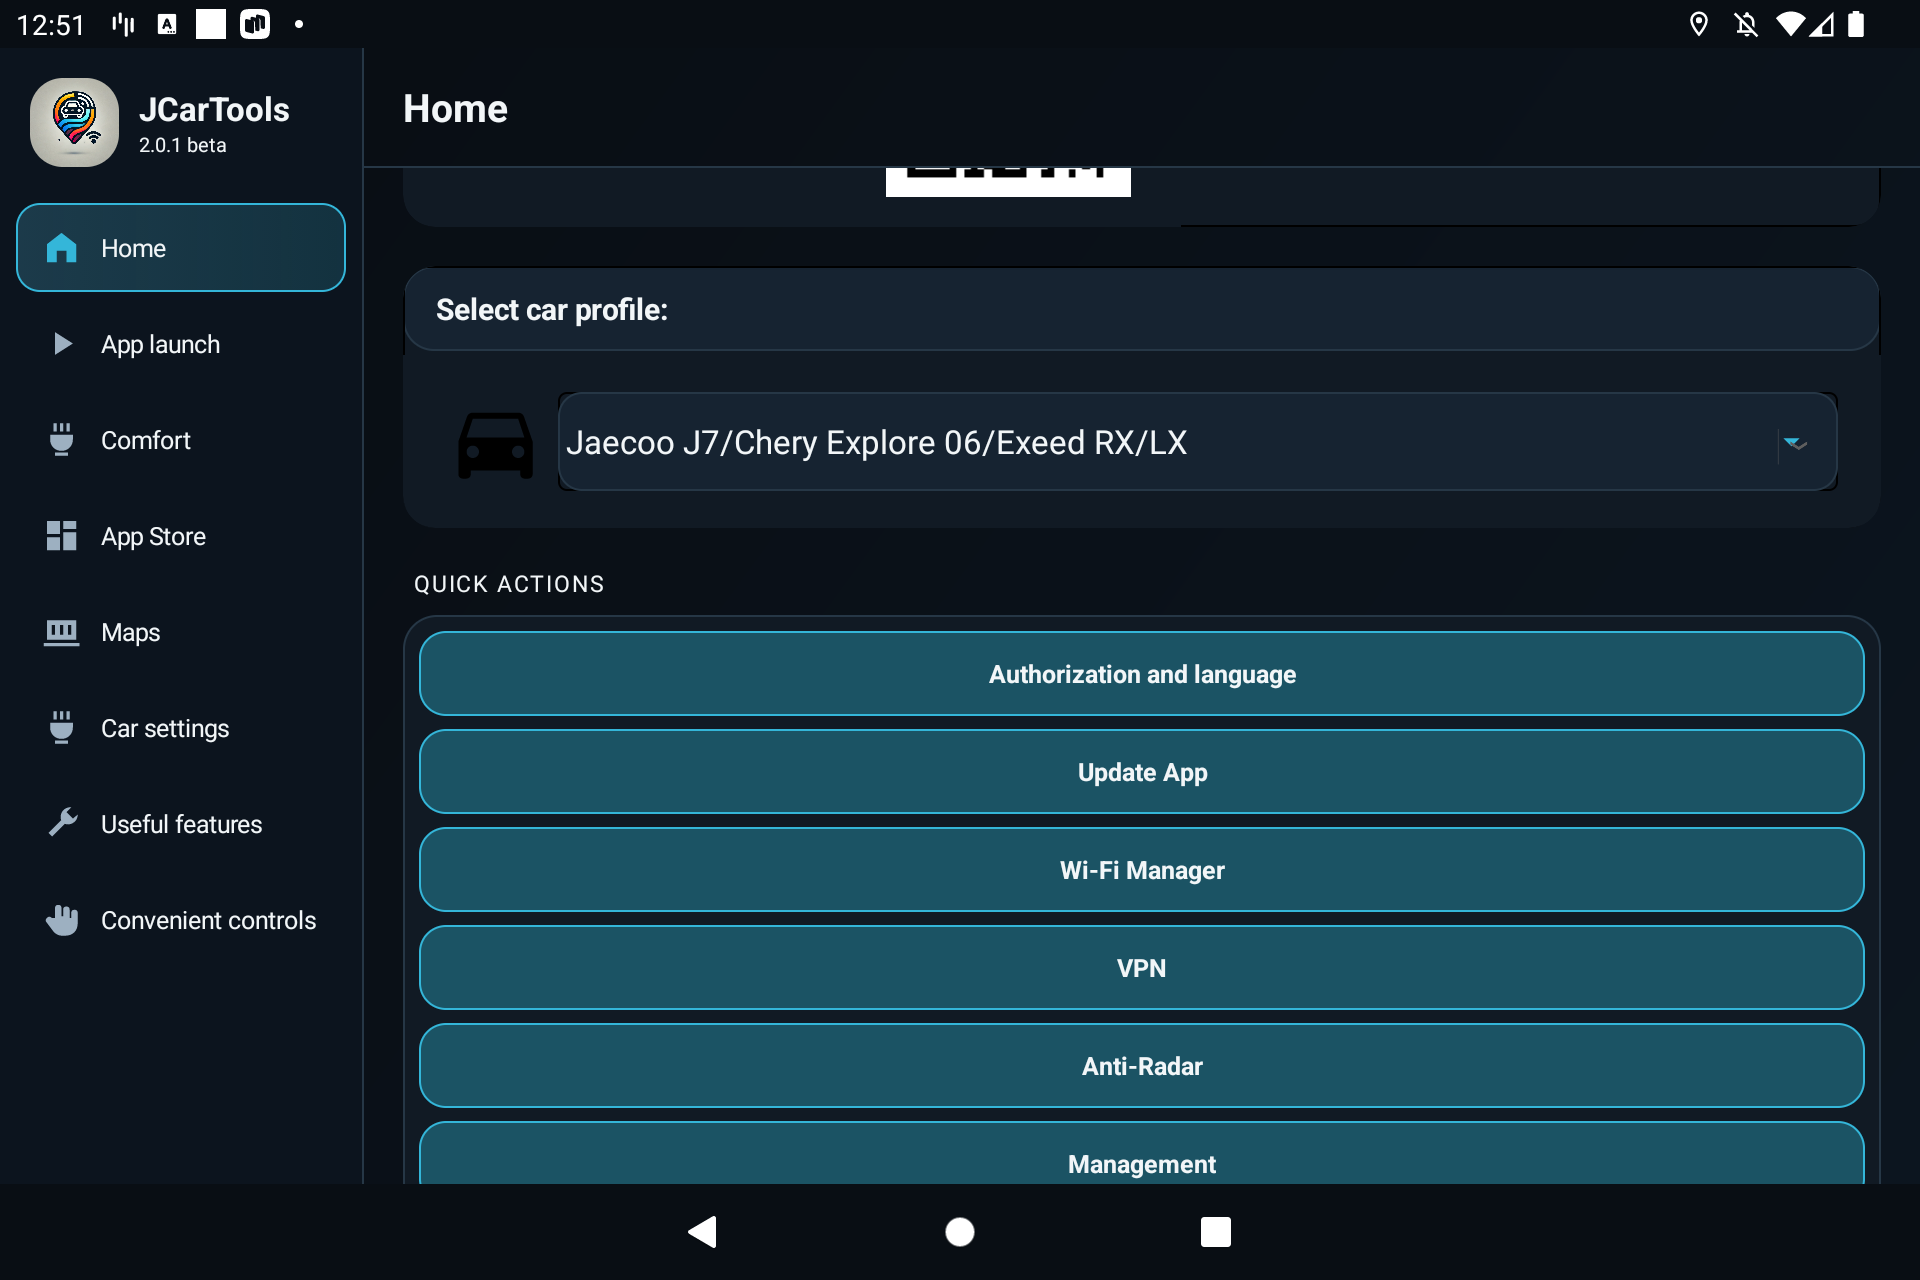
Start in Home. App launch, comfort and controls now have their own menu sections, so you do not need to search one long screen for every setting.
The selected profile determines which features JCarTools displays and which commands it can send to the vehicle. In “Vehicle profile”, always choose the entry intended for your exact make and model.
Open the main JCarTools screen and tap the vehicle profile field.
Select the profile for your own make and model. The screenshots use JAECOO J7 / CHERY Explore 06 / EXEED RX/LX only as an interface example.
The new profile is applied immediately. You do not need to restart JCarTools.
Check whether your vehicle has a profile
The list of supported profiles continues to grow. The names below help you identify the relevant vehicle family, but available features may differ even between cars of the same make.
2. Open an app on the instrument cluster
Open App launch → Apps on the instrument cluster in the menu.
Use this section to choose an app for the digital instrument cluster, such as Yandex Maps, Waze or another compatible navigation app.
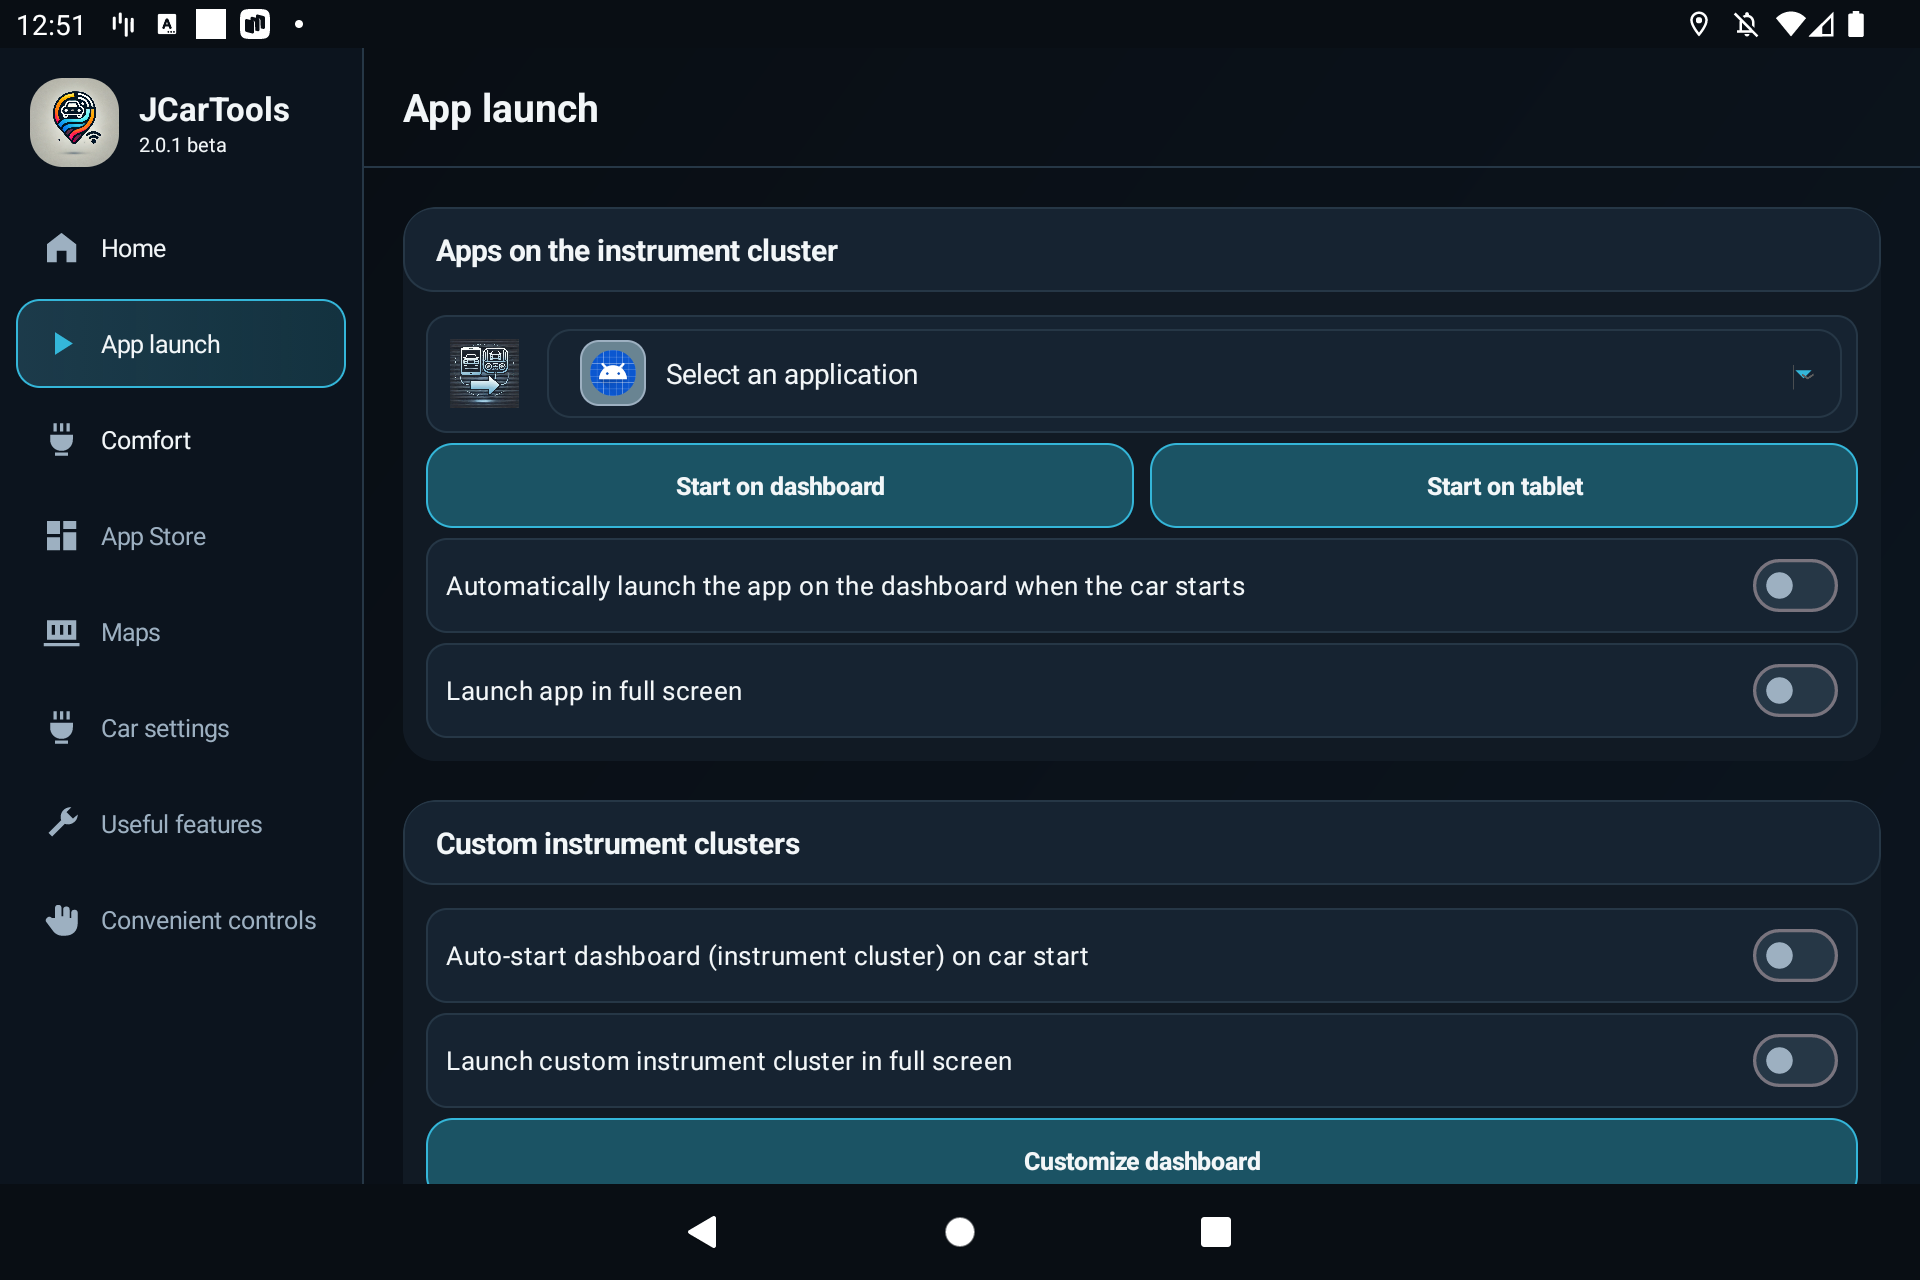
- Select Yandex Maps, Waze or another installed app.
- Use the manual instrument-cluster launch first. Check that the app opens and that you can return to the factory interface.
- If required, test the app on the tablet or centre display as well.
- Enable automatic launch only after the manual test succeeds.
- Test full-screen mode separately because it may cover factory information on some system versions.
The custom cluster settings are located nearby. They control the JCarTools instrument-cluster layout and, on supported profiles, the automatic launch of the custom gauges.
3. Cluster widgets and custom projection
In App launch, scroll below the custom instrument-cluster settings. In the example profile, this block is called Dashboard widgets. EXLANTIX vehicles show this data on the head-up display. Other supported vehicles show it on the instrument cluster, not on the head-up display. Open Settings beside the switch, choose the information you need, check the result and then enable the display.
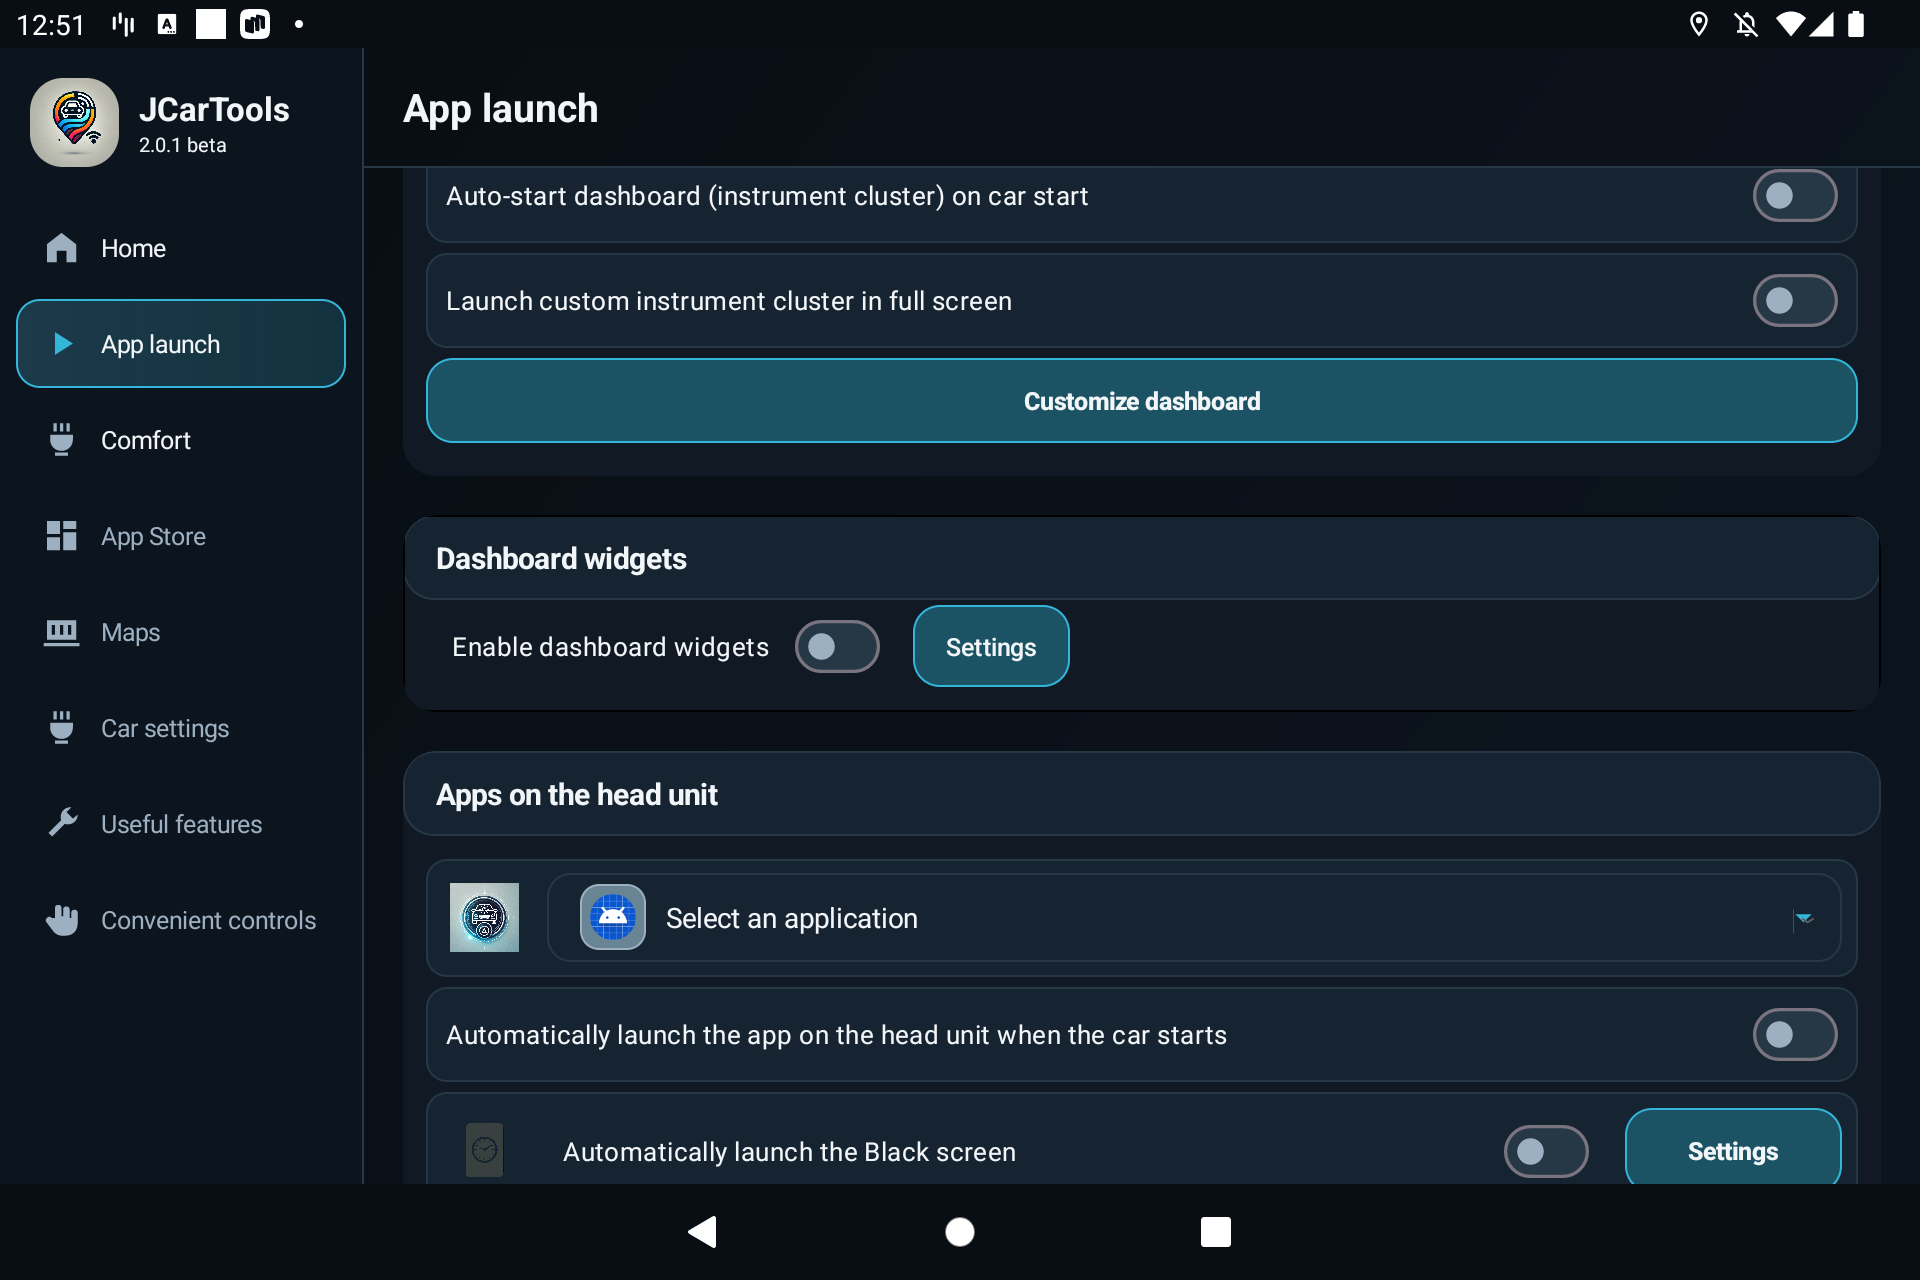
Depending on the profile, the configuration may include navigation details, speed-camera events, the current speed limit and the placement of guidance prompts. Availability also depends on the navigation app and the display method supported by the vehicle.
4. Automatically start an app on the head unit
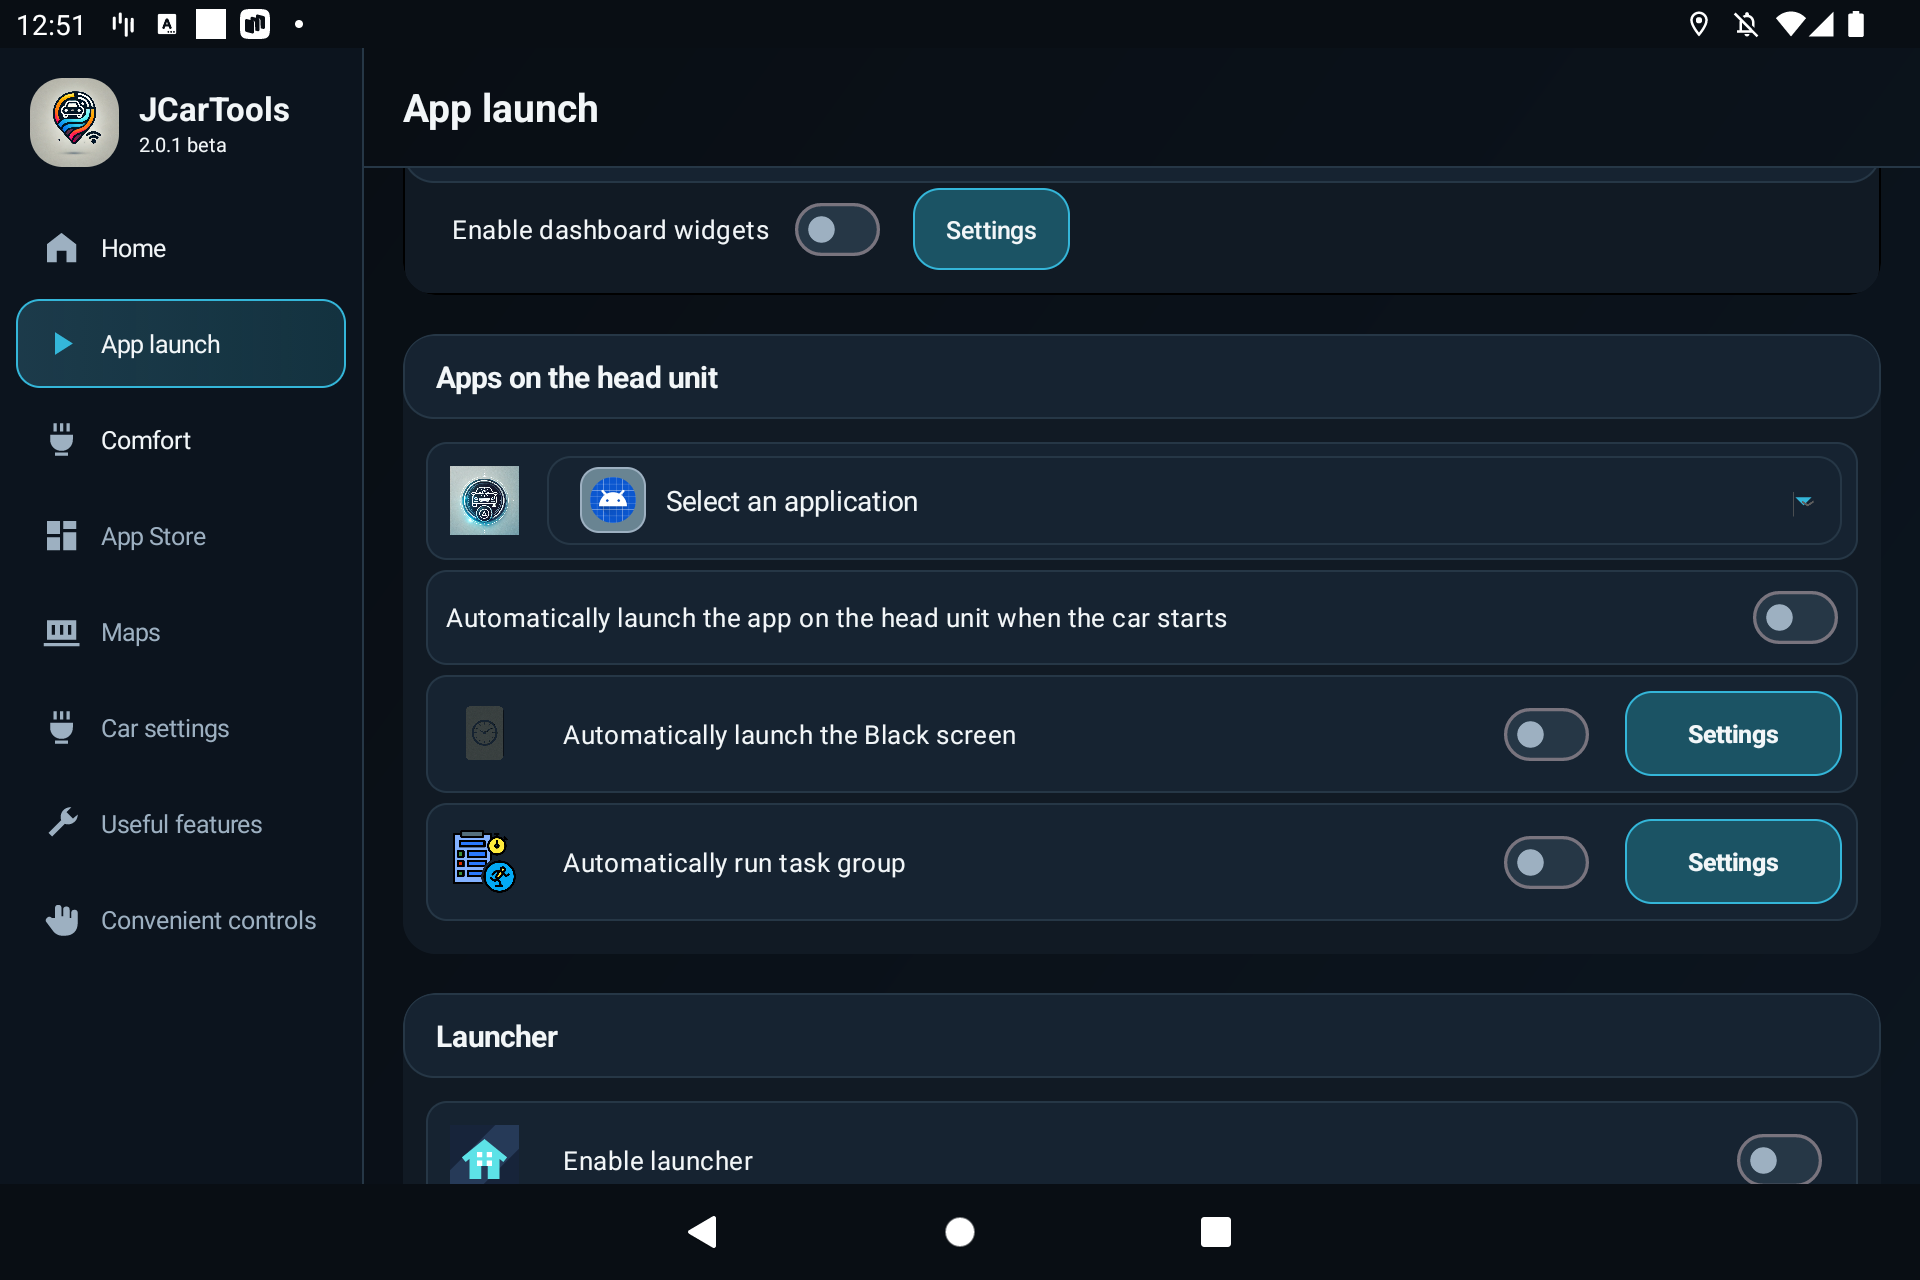
In App launch, find Apps on the head unit. A single app, the black screen and a task group have separate autostart switches.
Autostart can open navigation or a media player, or run a prepared task group when the vehicle starts.
- Select the required app.
- Open it manually and complete any first-run sign-in, confirmation or update.
- Enable “Automatically launch the app on the head unit when the vehicle starts”.
- Use the black-screen option only after testing its separate configuration.
- If you need several actions, create a task group and set their order.
5. Overlay widgets
Open Useful features → Widgets. These widgets appear over the head-unit interface; they are separate from the instrument-cluster widgets described above.
JCarTools can show a clock, outside temperature, free storage, music controls, weather and VPN status over the factory interface. The available widgets depend on the app version and selected profile.
- Over system elements allows widgets to appear above factory panels. Use it only when important controls remain visible.
- Size and position lets you move and resize widgets. Enable movement while arranging a widget, then disable it to prevent accidental changes. You can restore a widget to its normal size with the size control.
- Weather can use the built-in source or a supported external app.
- VPN shows connection status and opens its separate configuration.
- Clock, temperature, storage and music are enabled and configured individually.
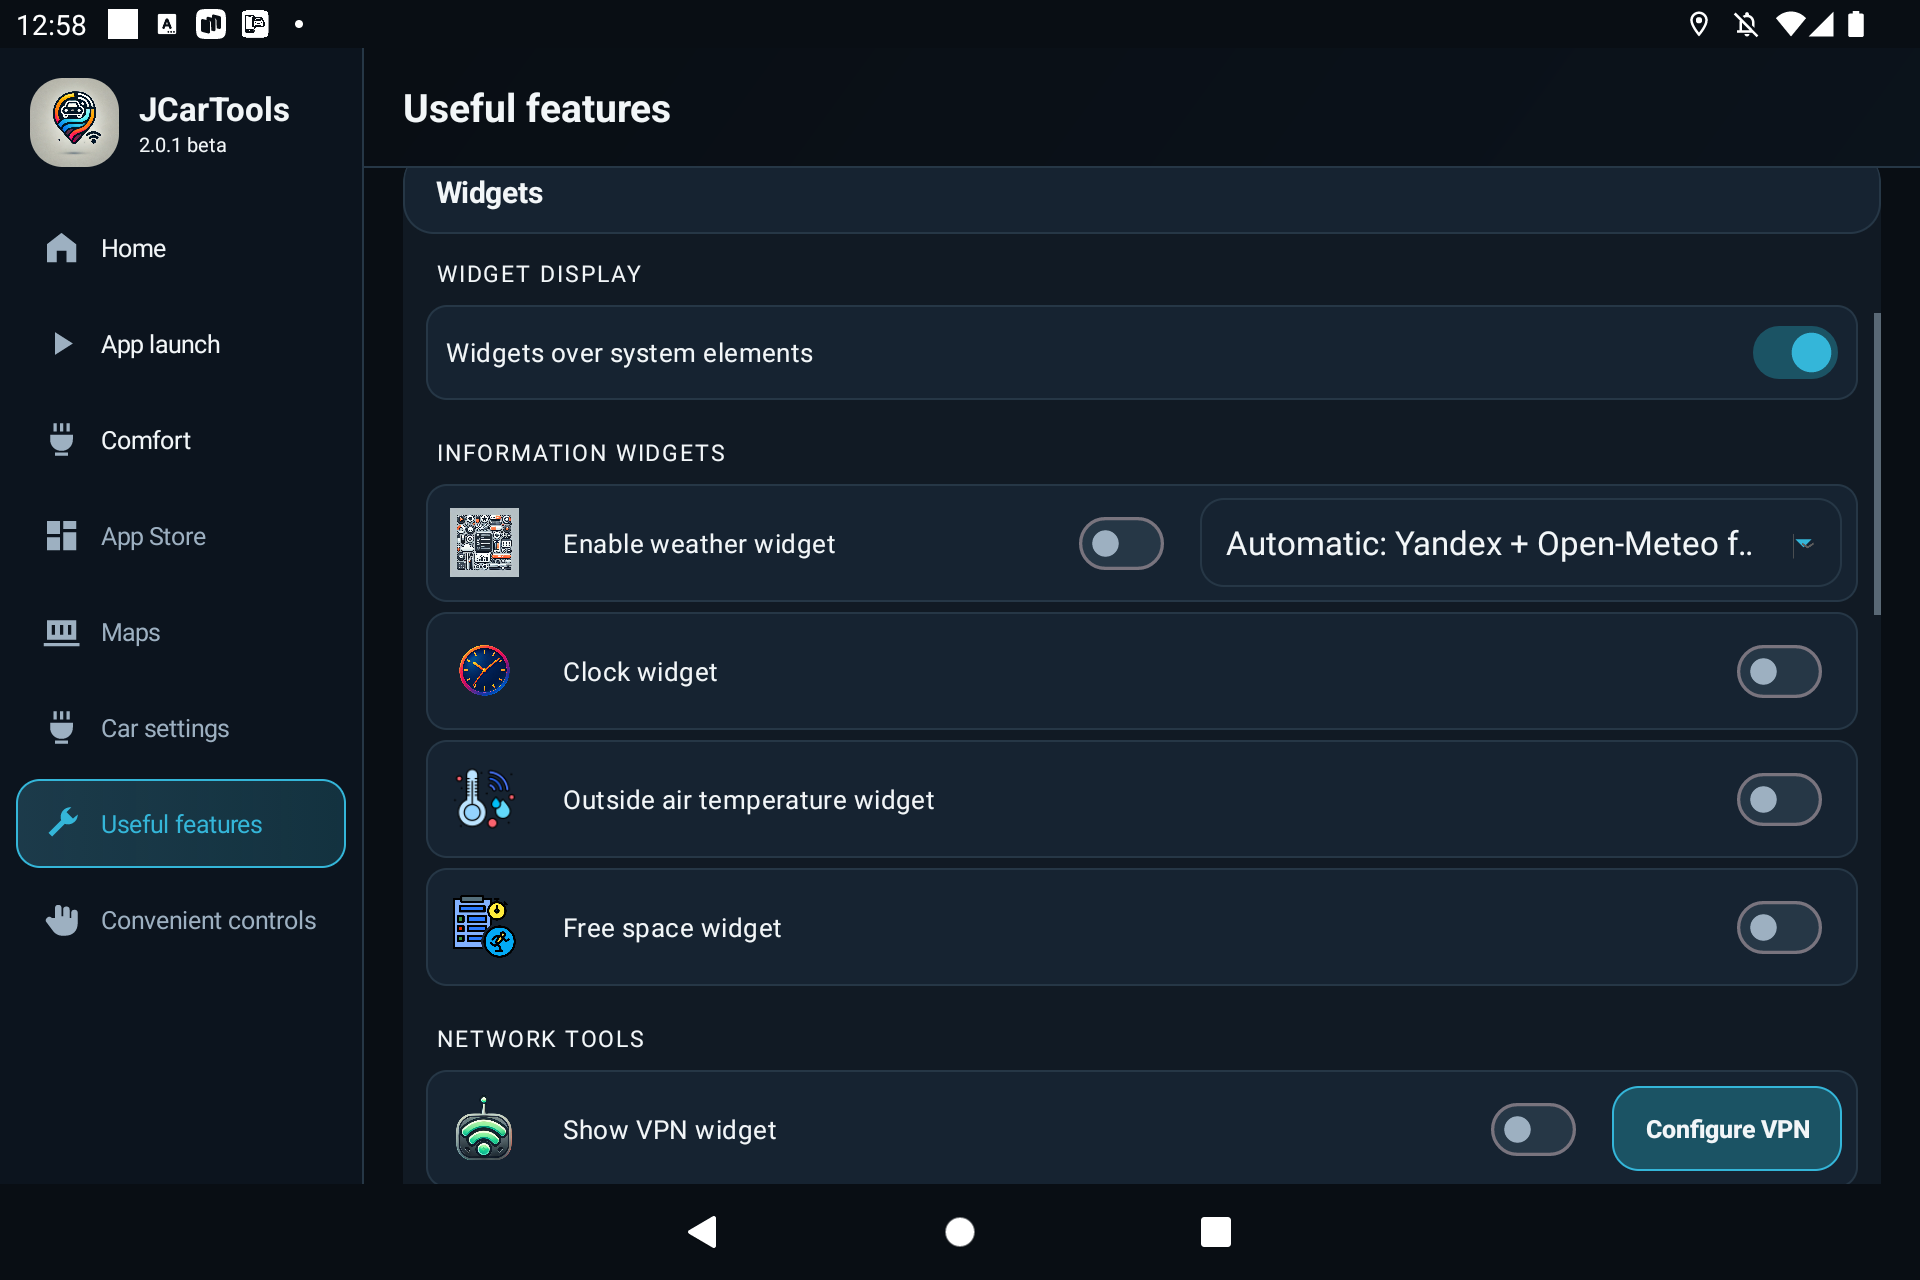
Start with one widget. Keep it clear of climate controls, camera views, system warnings and navigation controls, then add the others.
6. Apps, permissions and system tools
Select App Store in the menu to find app installation and management tools. Use APK files only from sources you trust.
- Install / uninstall / grant permissions manages apps and their access rights.
- JCTStore provides a catalogue of prepared apps.
- File manager lets you work with files stored on the head unit.
- Hide apps removes selected apps from the visible factory list without necessarily uninstalling them.
Location sharing and GPS spoofing are in Useful features. Edge swipes are in Convenient controls. Test gestures while parked because they may conflict with factory system gestures.
7. Vehicle settings
After you select the correct make and model, JCarTools shows “Vehicle settings” only when the profile includes at least one supported function. The contents vary by profile and may include automatic Start/Stop deactivation, speed-warning controls, drive modes or selected driver-assistance settings. Unsupported switches—and an empty section—are not shown.
The screenshots use the most feature-complete JAECOO profile. Your list may be shorter or contain different options. A visible switch does not guarantee support across every trim level or firmware version of the same model.
Do not disable driver-assistance or emergency-braking features just to experiment. Follow the vehicle manual and local regulations.
If a feature behaves unpredictably, return its switch to the previous state and verify that the correct profile is selected. Do not use another model's profile as a workaround.
8. Comfort automations
Open Comfort in the menu. Select the driver before adjusting the automation cards.
Comfort automations activate a feature when the vehicle starts and the configured conditions are met. Depending on the vehicle, you may be able to configure seat heating and ventilation, steering-wheel heating, and windscreen or rear-window heating.
Select a driver
The Driver 1, Driver 2 and Driver 3 tabs store separate automation settings. Select the driver before changing any cards. Use Driver 1 for all drivers applies a single shared set instead.
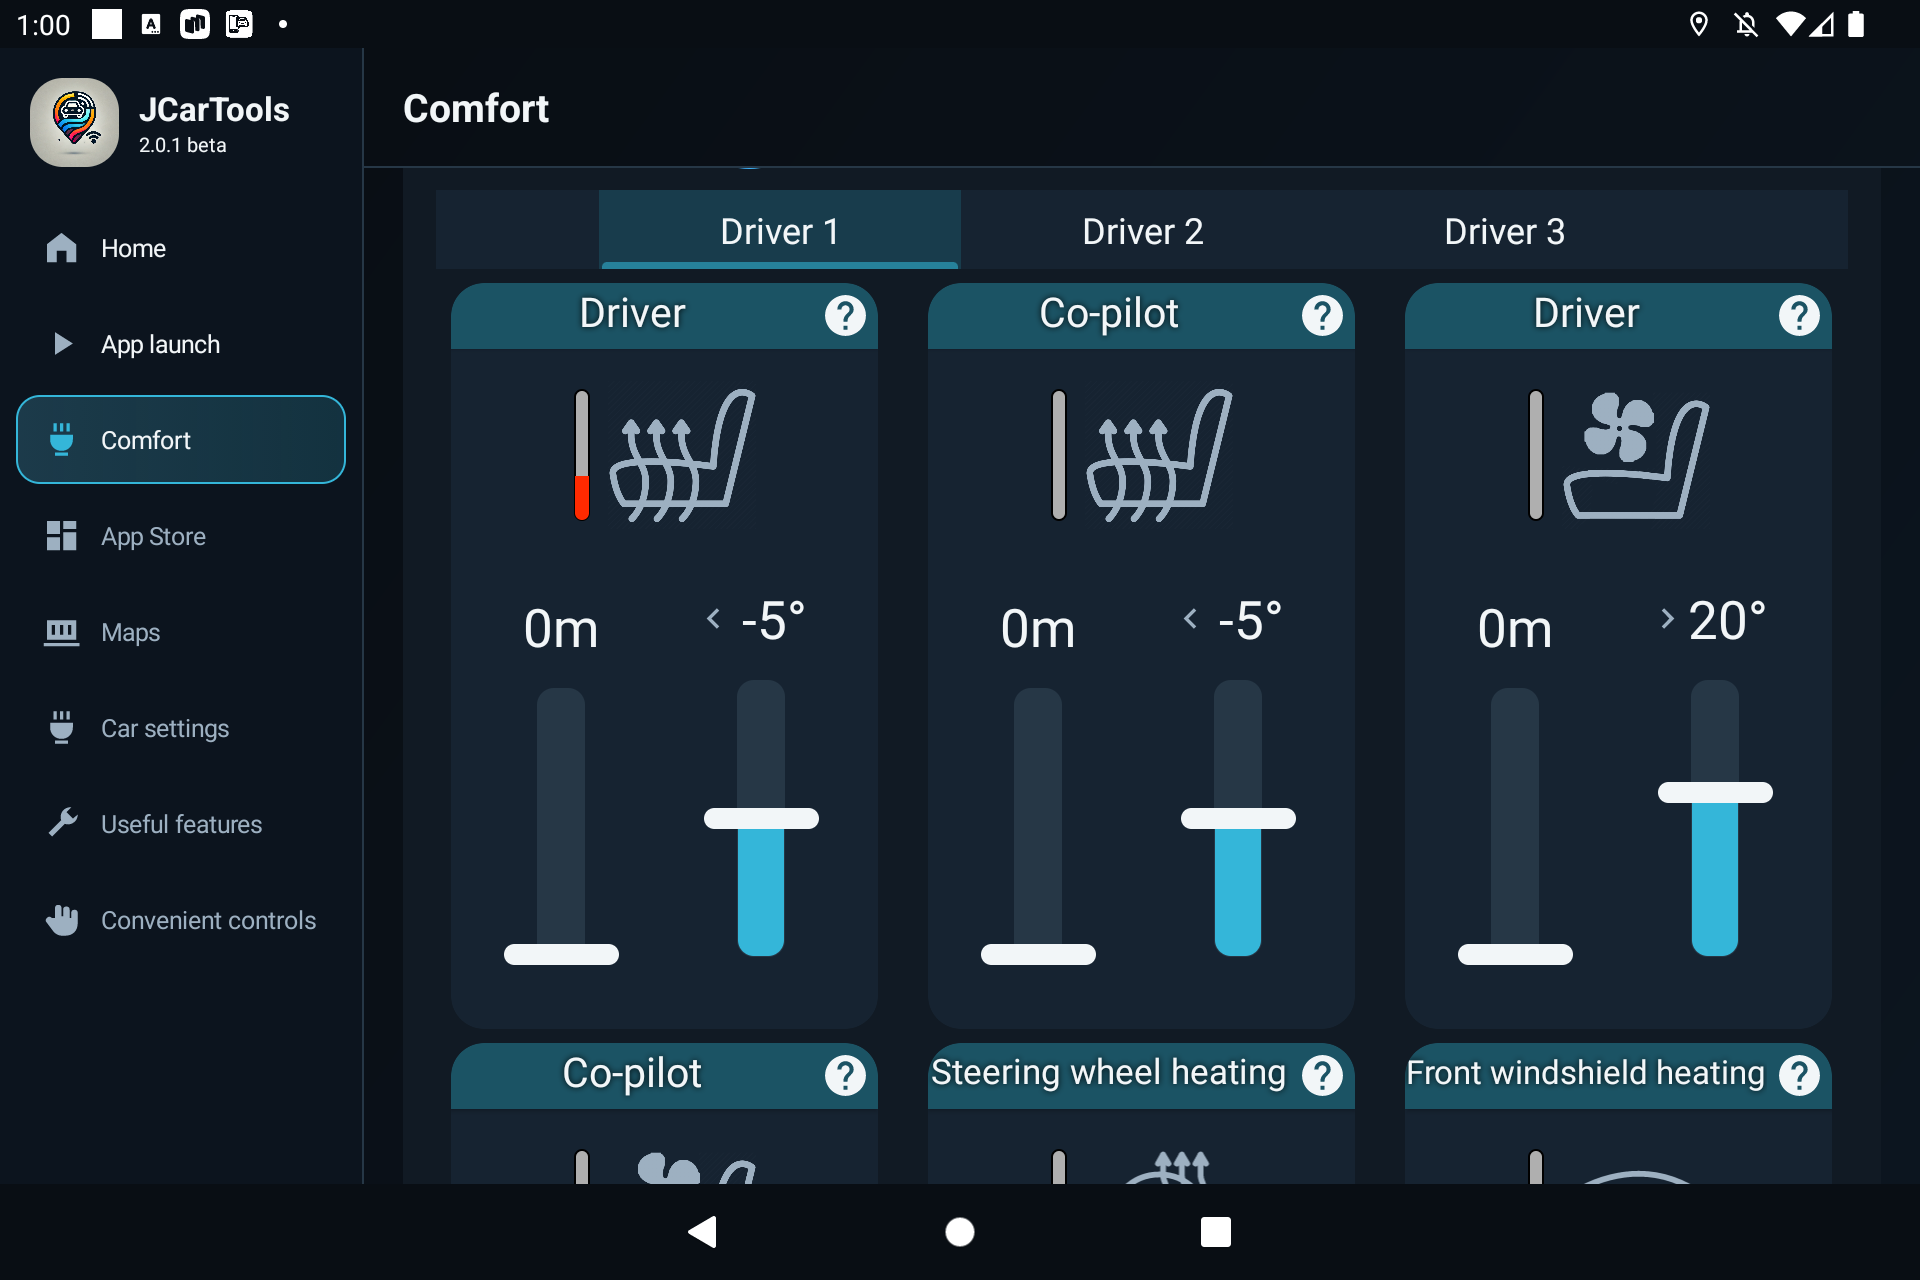
Configure an automation card
Each card has three main controls:
- Feature icon and level. Tap the large seat, steering-wheel or window icon. Seat controls cycle through the available levels and then off; steering-wheel and window heating toggle between on and off.
- Left slider: operating time. Set how long the feature should remain active. A value of 0 minutes means JCarTools will not switch it off by timer.
- Right slider: temperature threshold. Heating starts when the outside temperature is below the selected value; ventilation starts when it is above that value.
Winter example: select level 2 seat heating, a −5 °C threshold and a 10-minute duration. Below −5 °C, JCarTools activates level 2 and switches it off after 10 minutes.
Summer example: configure seat ventilation above +20 °C, then choose the level and operating time.
Features that can use this type of automation
- driver and passenger seat heating;
- driver and passenger seat ventilation;
- steering-wheel heating;
- windscreen heating;
- rear-window and mirror heating.
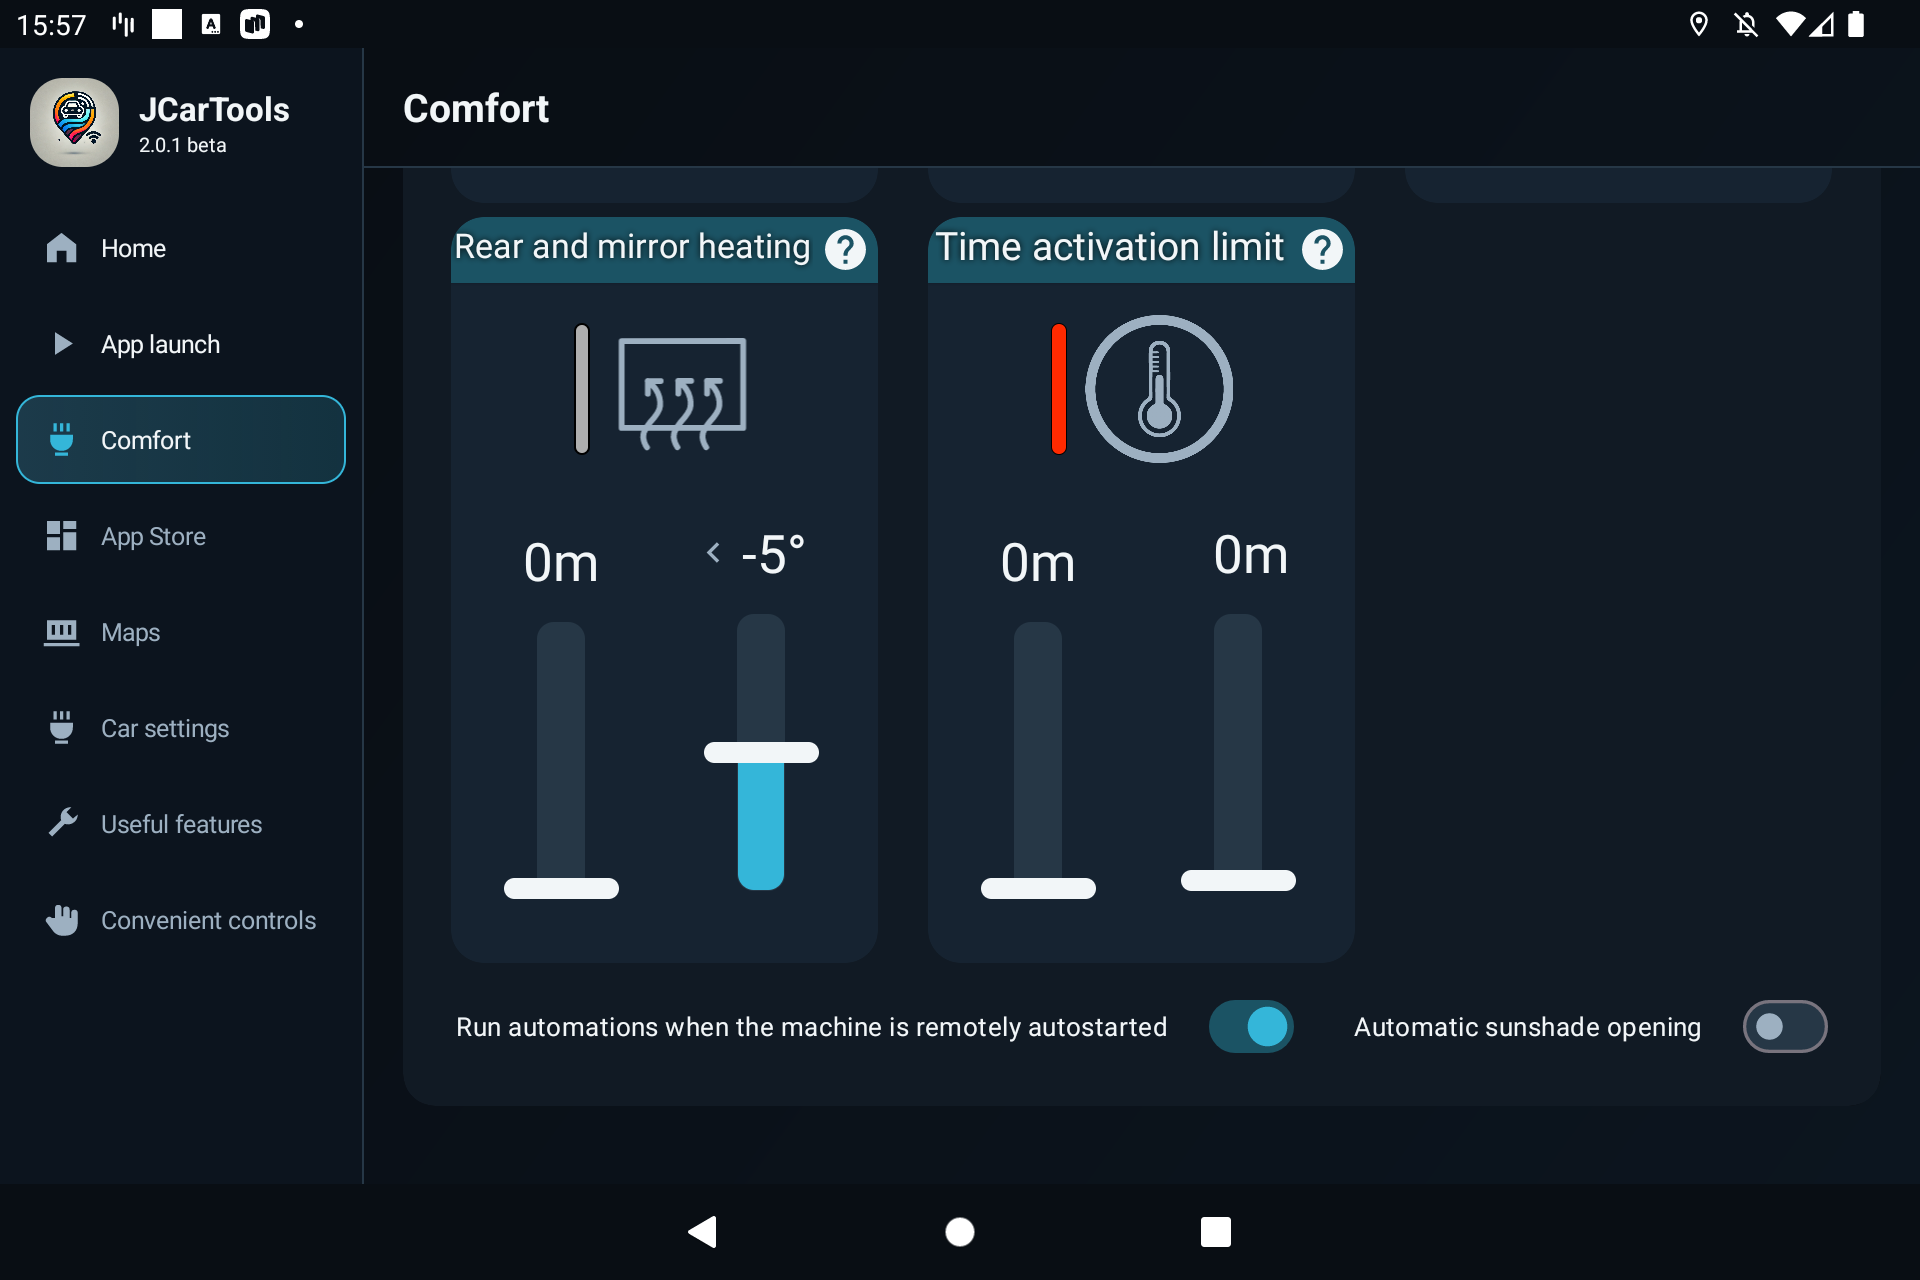
Shared timing limits
The “Activation time limit” card applies to all temperature-based automations:
- Check outside temperature. When enabled, each automation uses its temperature threshold. If disabled, those thresholds are ignored.
- Minimum break between trips. This prevents automations from running again after a short stop. For example, a 10-minute value prevents a new activation if the vehicle was off for less than 10 minutes. A value of 0 disables this limit.
- Activation window after startup. This defines how long after the head unit starts an automation may still activate. A value of 0 leaves the window unrestricted.
If outside-temperature checking is disabled, make sure heating and ventilation are not both enabled for the same seat. Test the result over several normal vehicle starts.
Remote start and sunshade
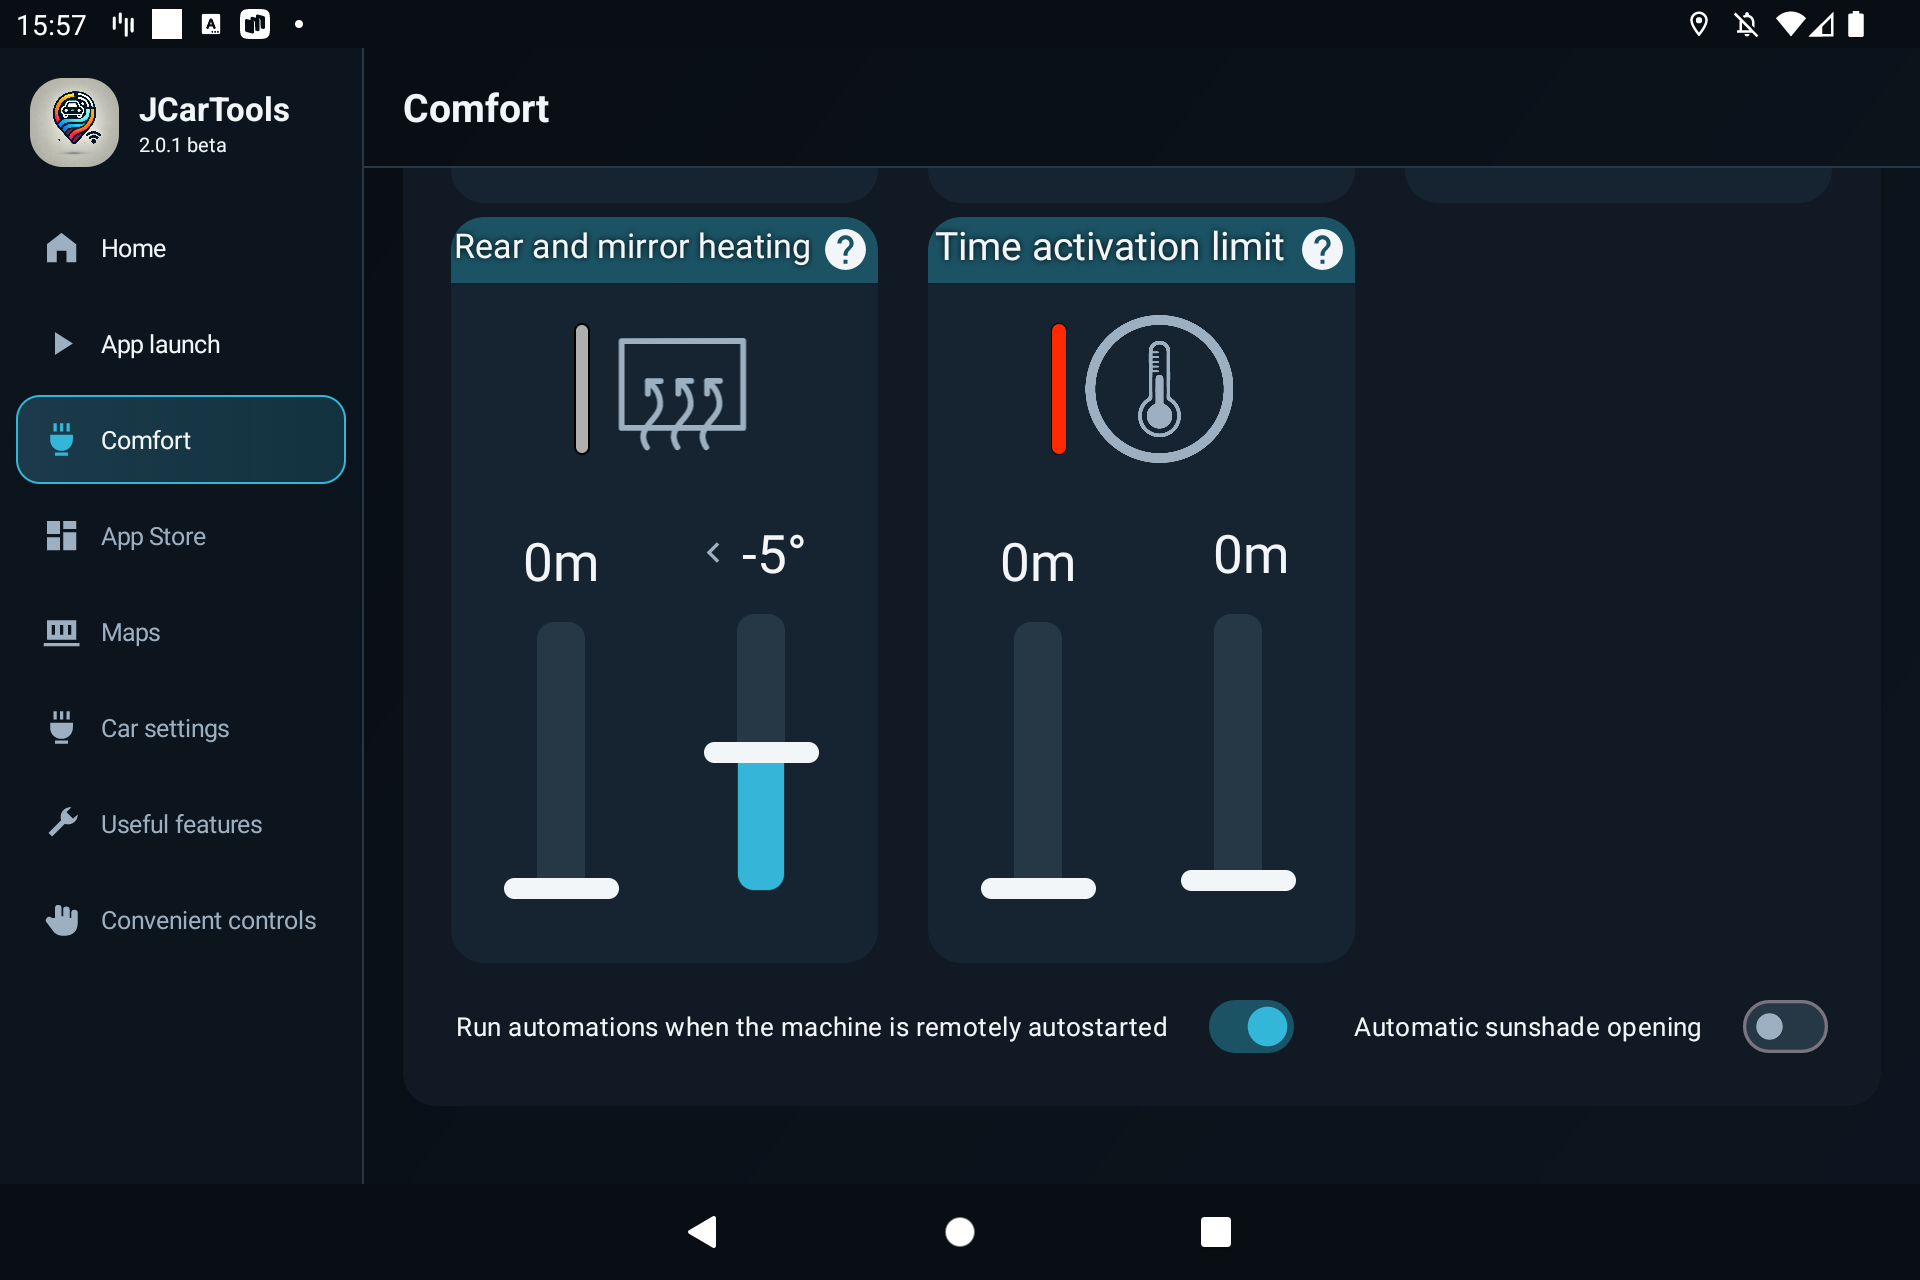
“Run automations during remote vehicle start” allows the configured comfort scenarios to operate after a remote engine start, so supported cabin features can begin heating or ventilation in advance.
“Automatically open the sunshade” is a separate option. At vehicle startup, JCarTools sends the opening command if the shade is closed and the selected profile supports the function.
9. Floating button, multi-button, gestures and steering-wheel controls
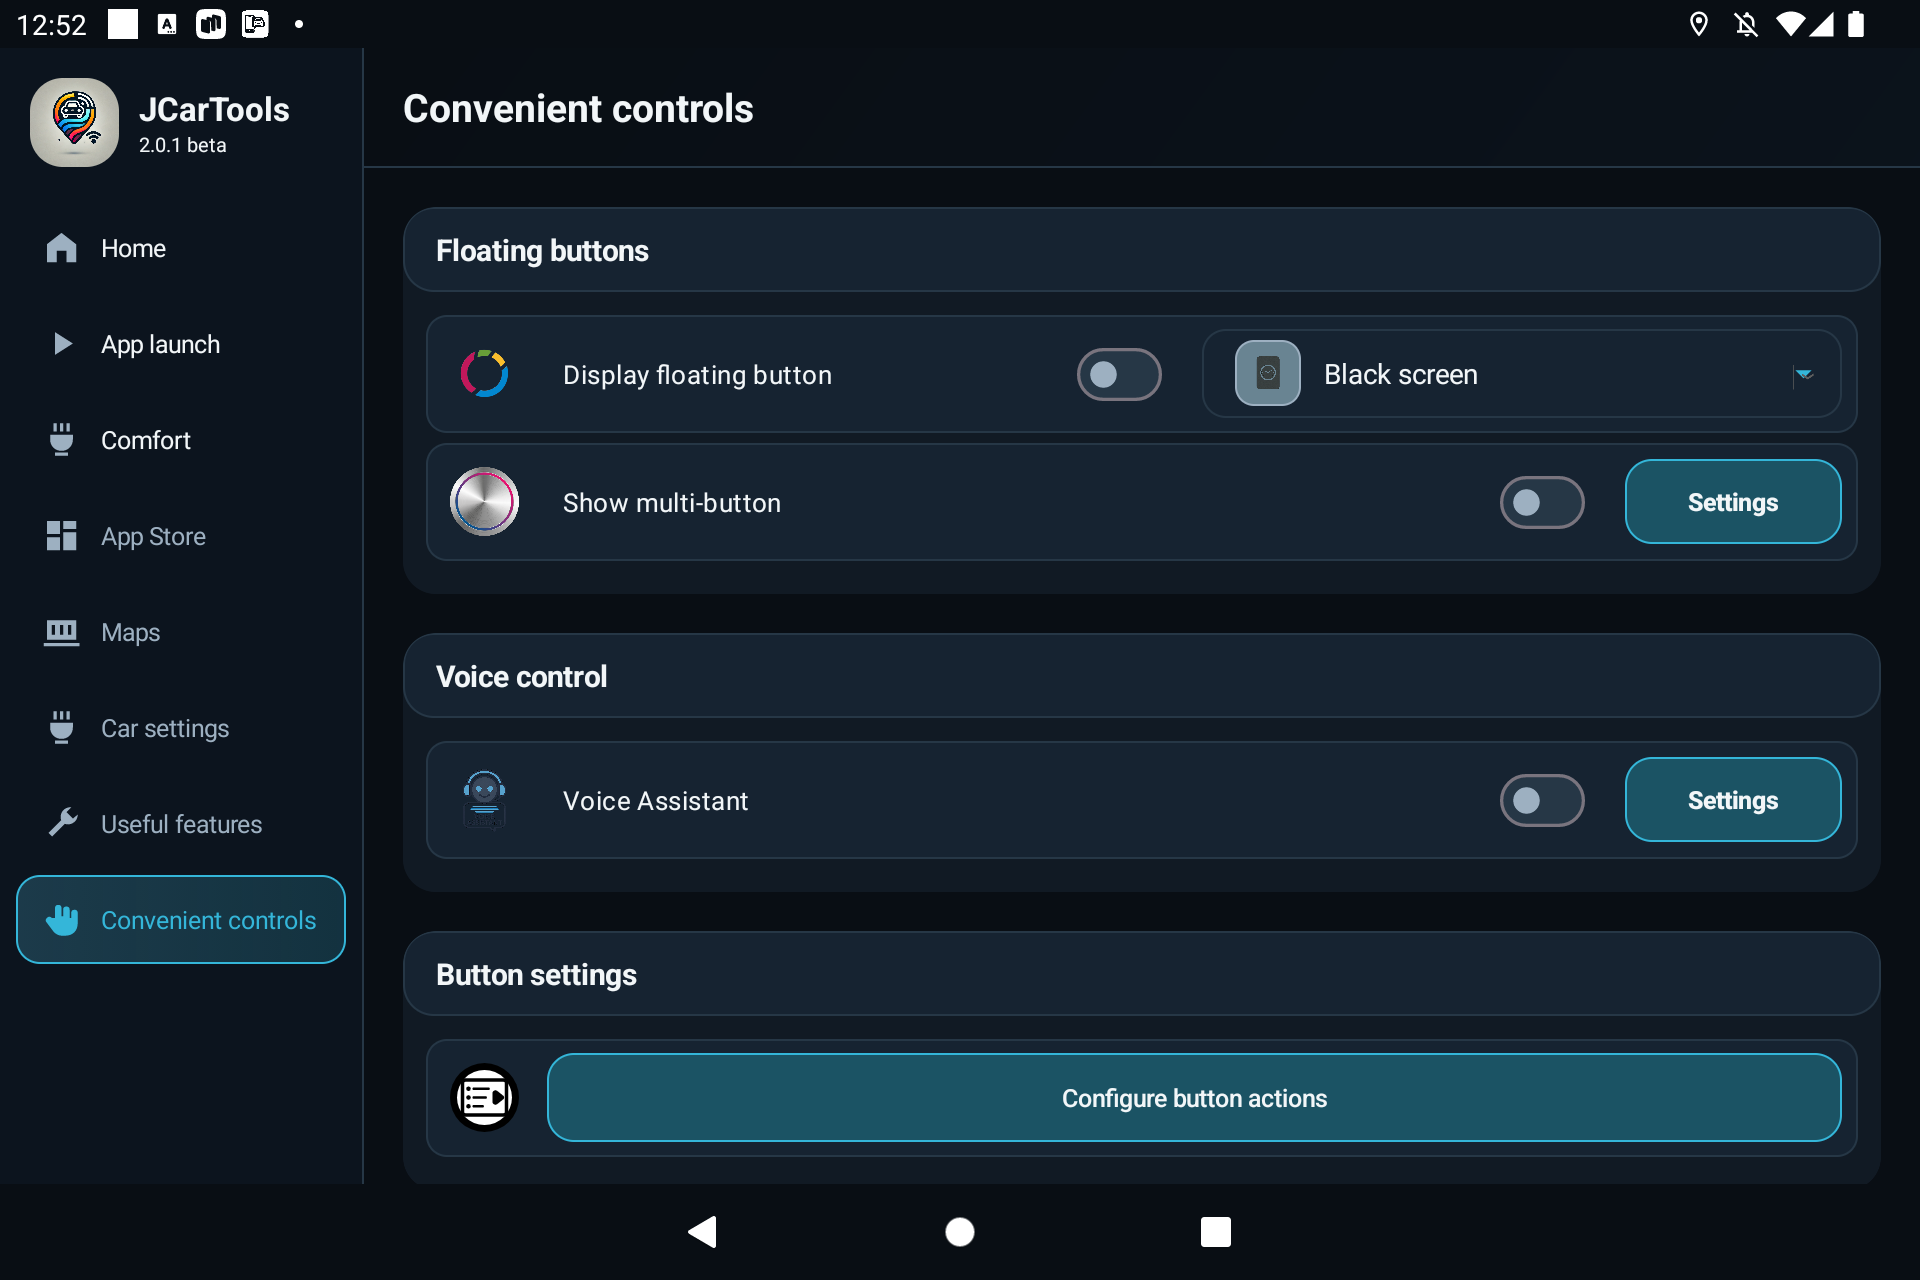
Open Convenient controls. Floating buttons and voice settings are at the top; button assignments, gestures and edge zones are farther down.
Floating button
The standard floating button performs one selected action. Enable “Show floating button”, then choose its action. A frequently used app or screen is a good first test.
To reposition the button, enable its movement control and drag it to a clear area. Disable movement afterwards so it stays in place. Do not cover climate controls, camera views, system warnings or factory controls.
Multi-button
The multi-button provides access to several actions. Enable it and select “Configure” to choose the commands. Keep the list short enough that the main actions remain easy to reach.
Gestures and edge swipes
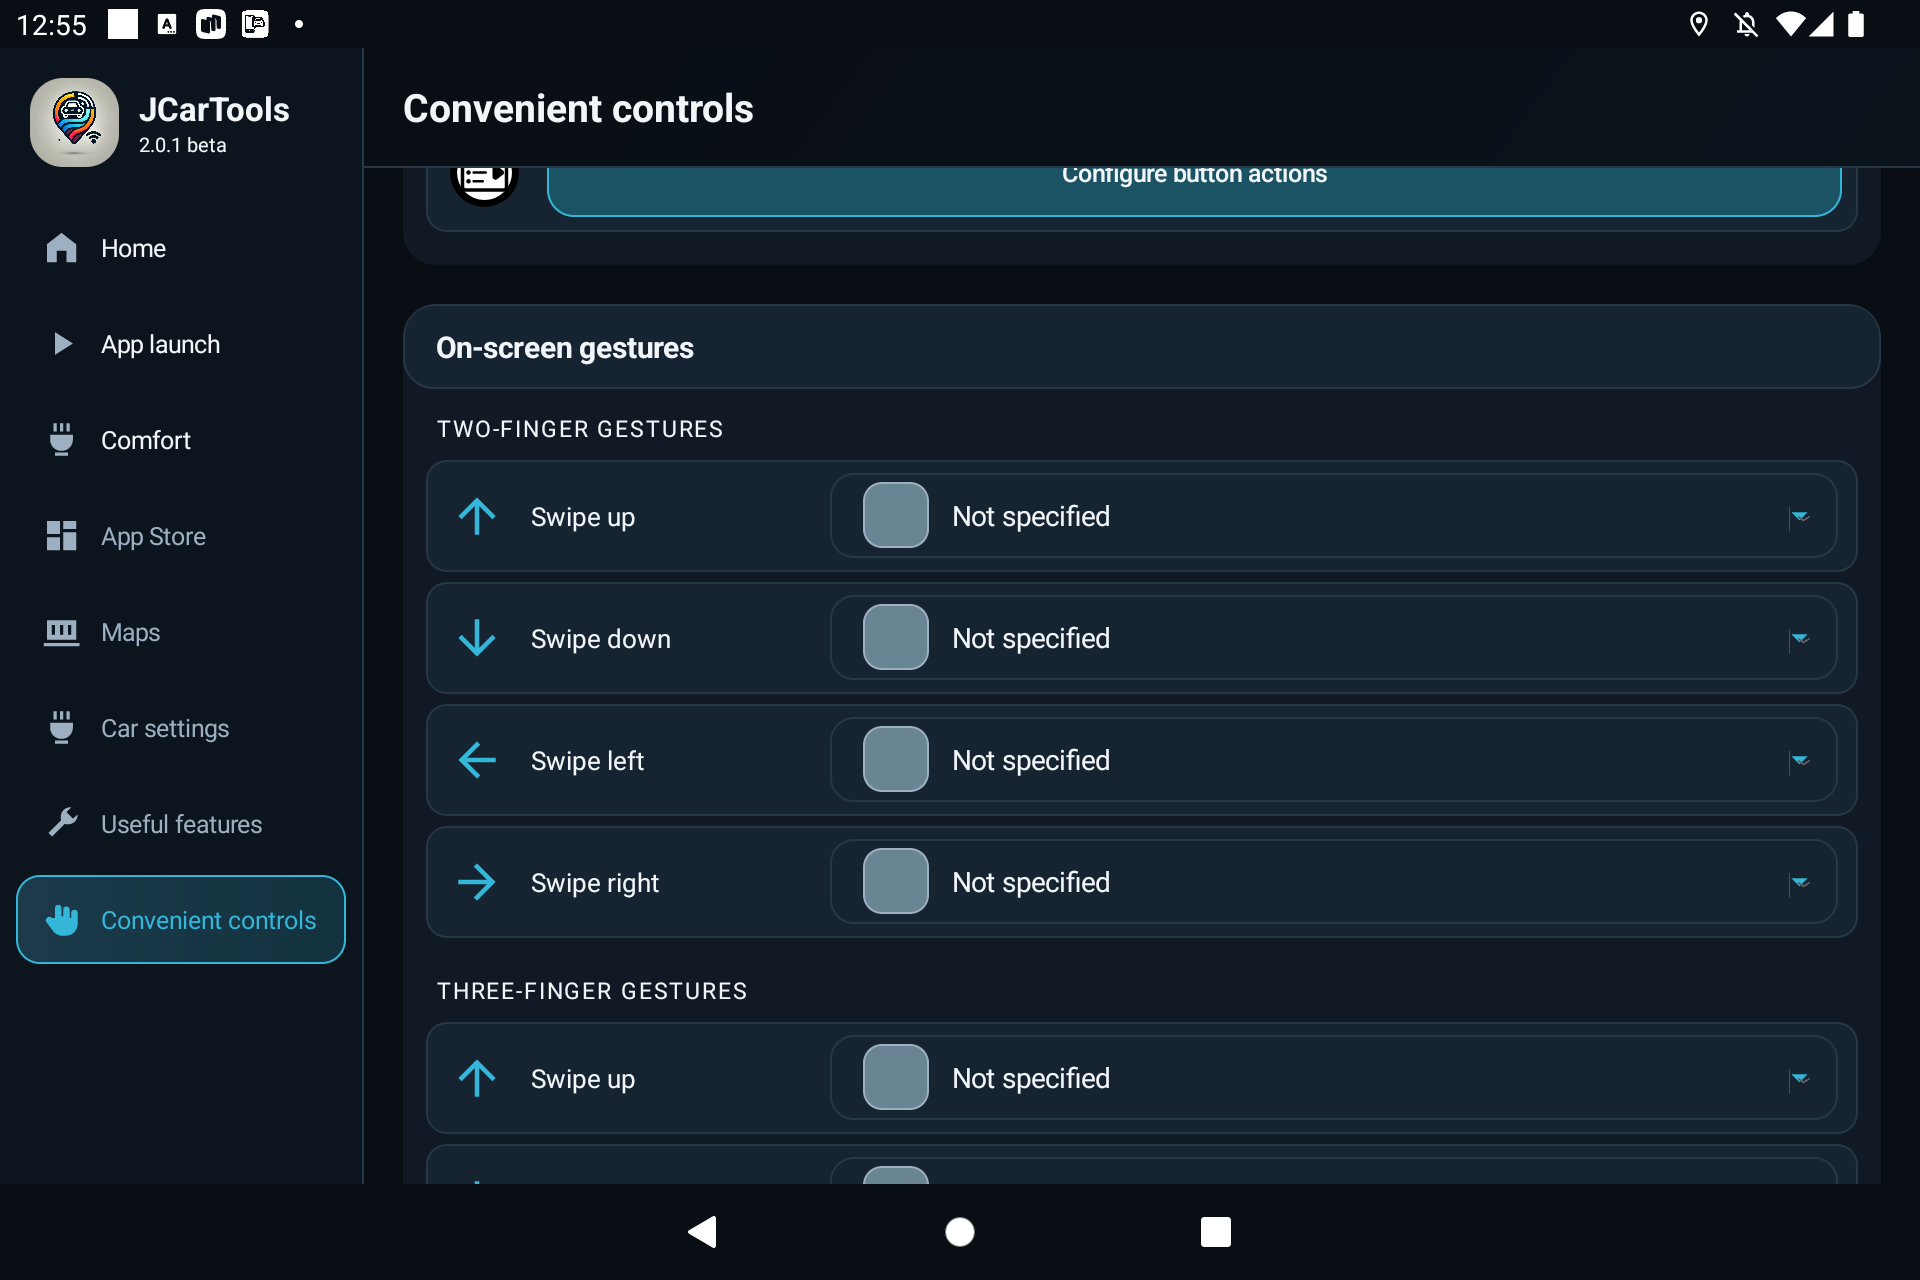
You can assign separate actions to upward, downward, left and right gestures. Depending on the profile, JCarTools may also provide grouped gestures and edge-swipe settings. Leave unused directions set to “Not assigned”.
- Assign one safe action, such as opening navigation.
- Test it several times while parked.
- Make sure it does not interfere with factory swipes, notifications or the system Back gesture.
- Configure the remaining directions only after the first one works correctly.
Steering-wheel buttons
Supported profiles can assign actions to compatible physical buttons. Test short and long presses with a simple command first, and confirm that the factory function still behaves as expected. Available buttons and actions depend on the vehicle.
Do not replace controls used for safety, communication or driver-assistance systems.
10. JCarTools voice assistant
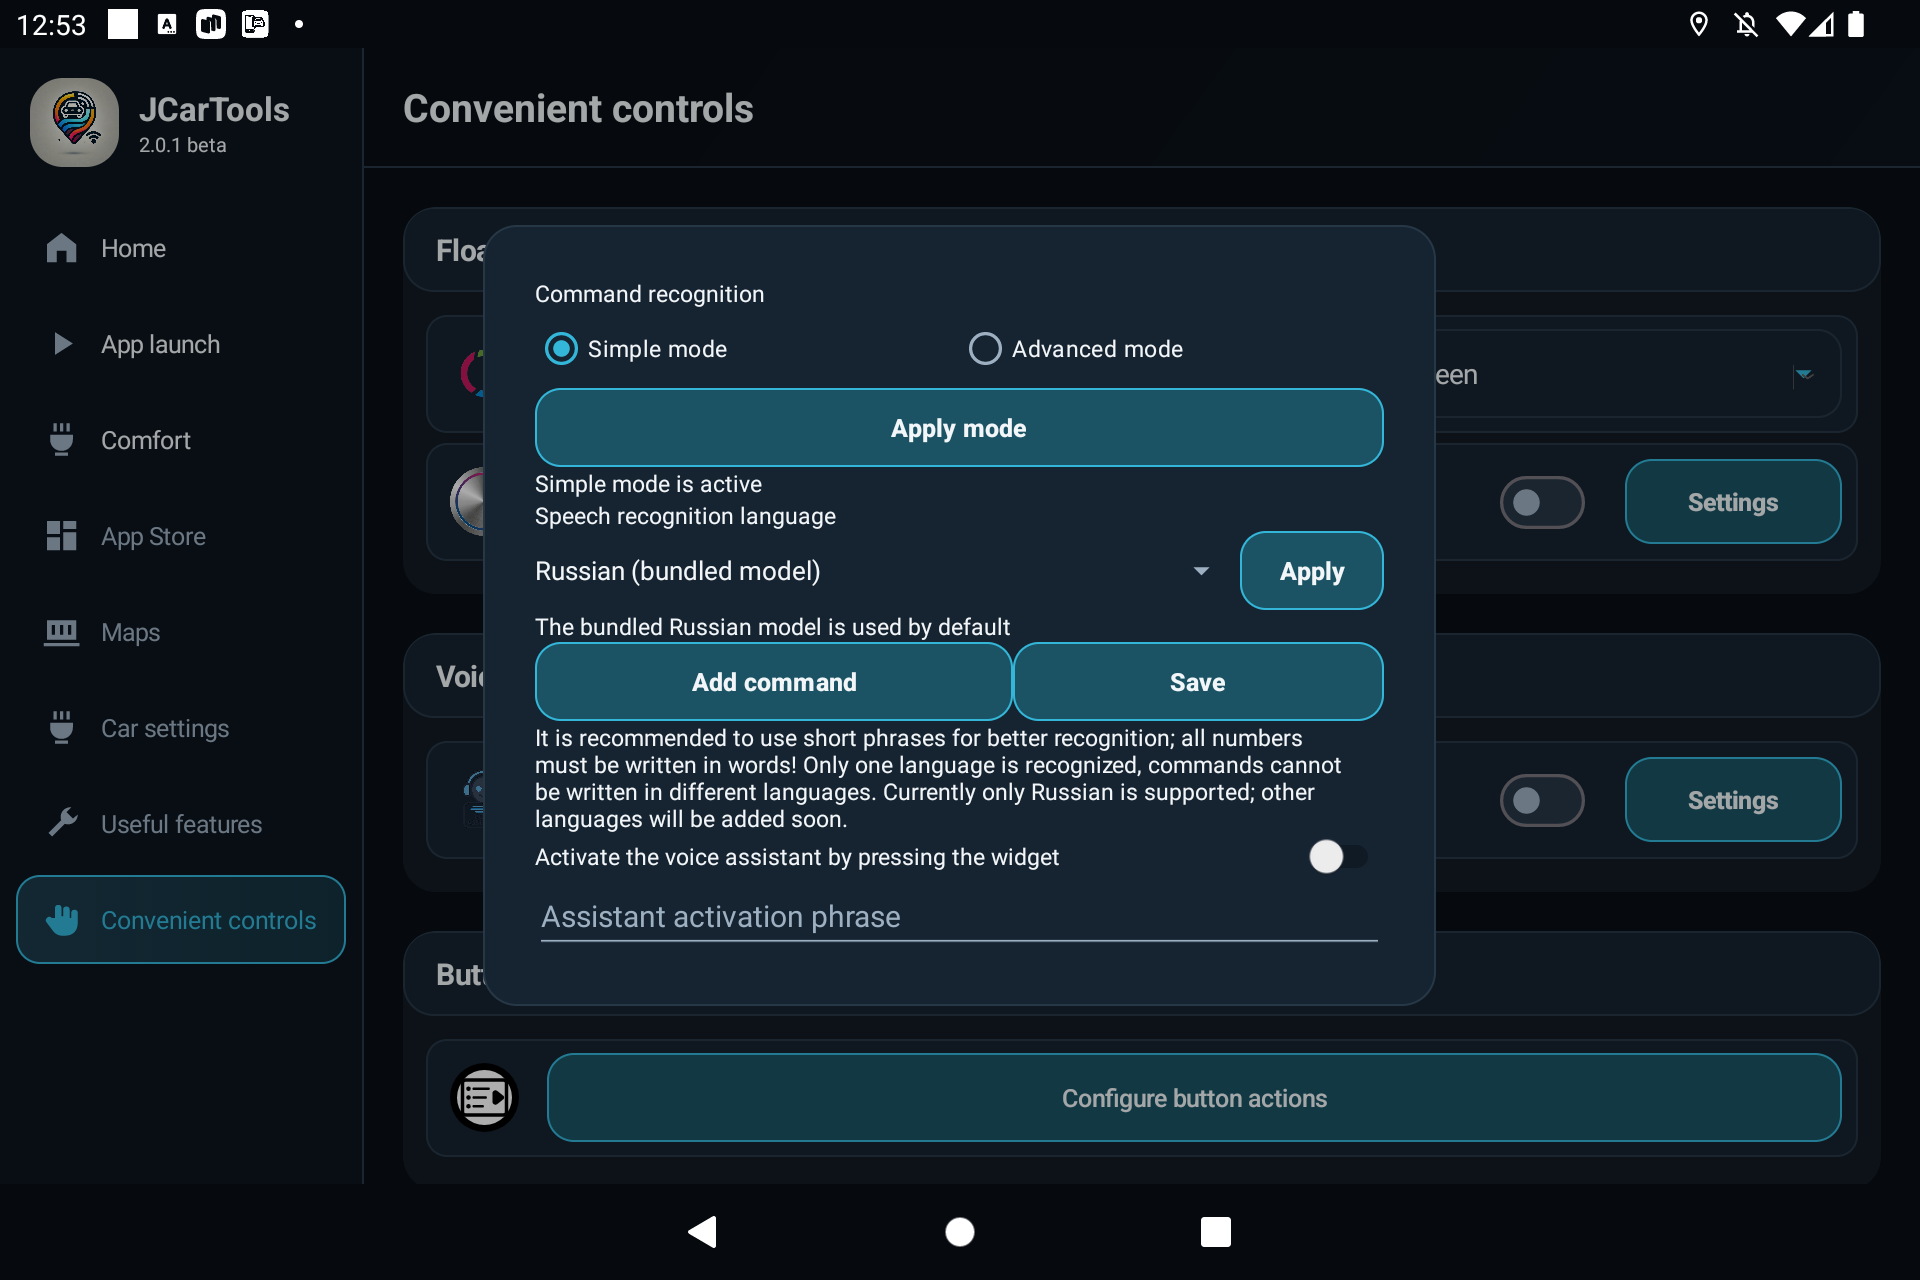
Open Convenient controls → Voice control. Enable Voice Assistant and select Settings. This window contains the recognition language, activation method, spoken phrases and their actions.
Choose a recognition mode at the top of the window, then tap Apply mode:
- Simple mode: add commands manually by entering a phrase and choosing the action it should trigger.
- Advanced mode: the assistant can perform all commands available in the shared action list for your vehicle and profile. You do not need to add them individually. If you prefer your own wording or want to clarify which action you mean, add a command manually and link your phrase to that action.
Recognition mode and activation method are separate settings. In either mode, you can start listening with a wake phrase or through an action.
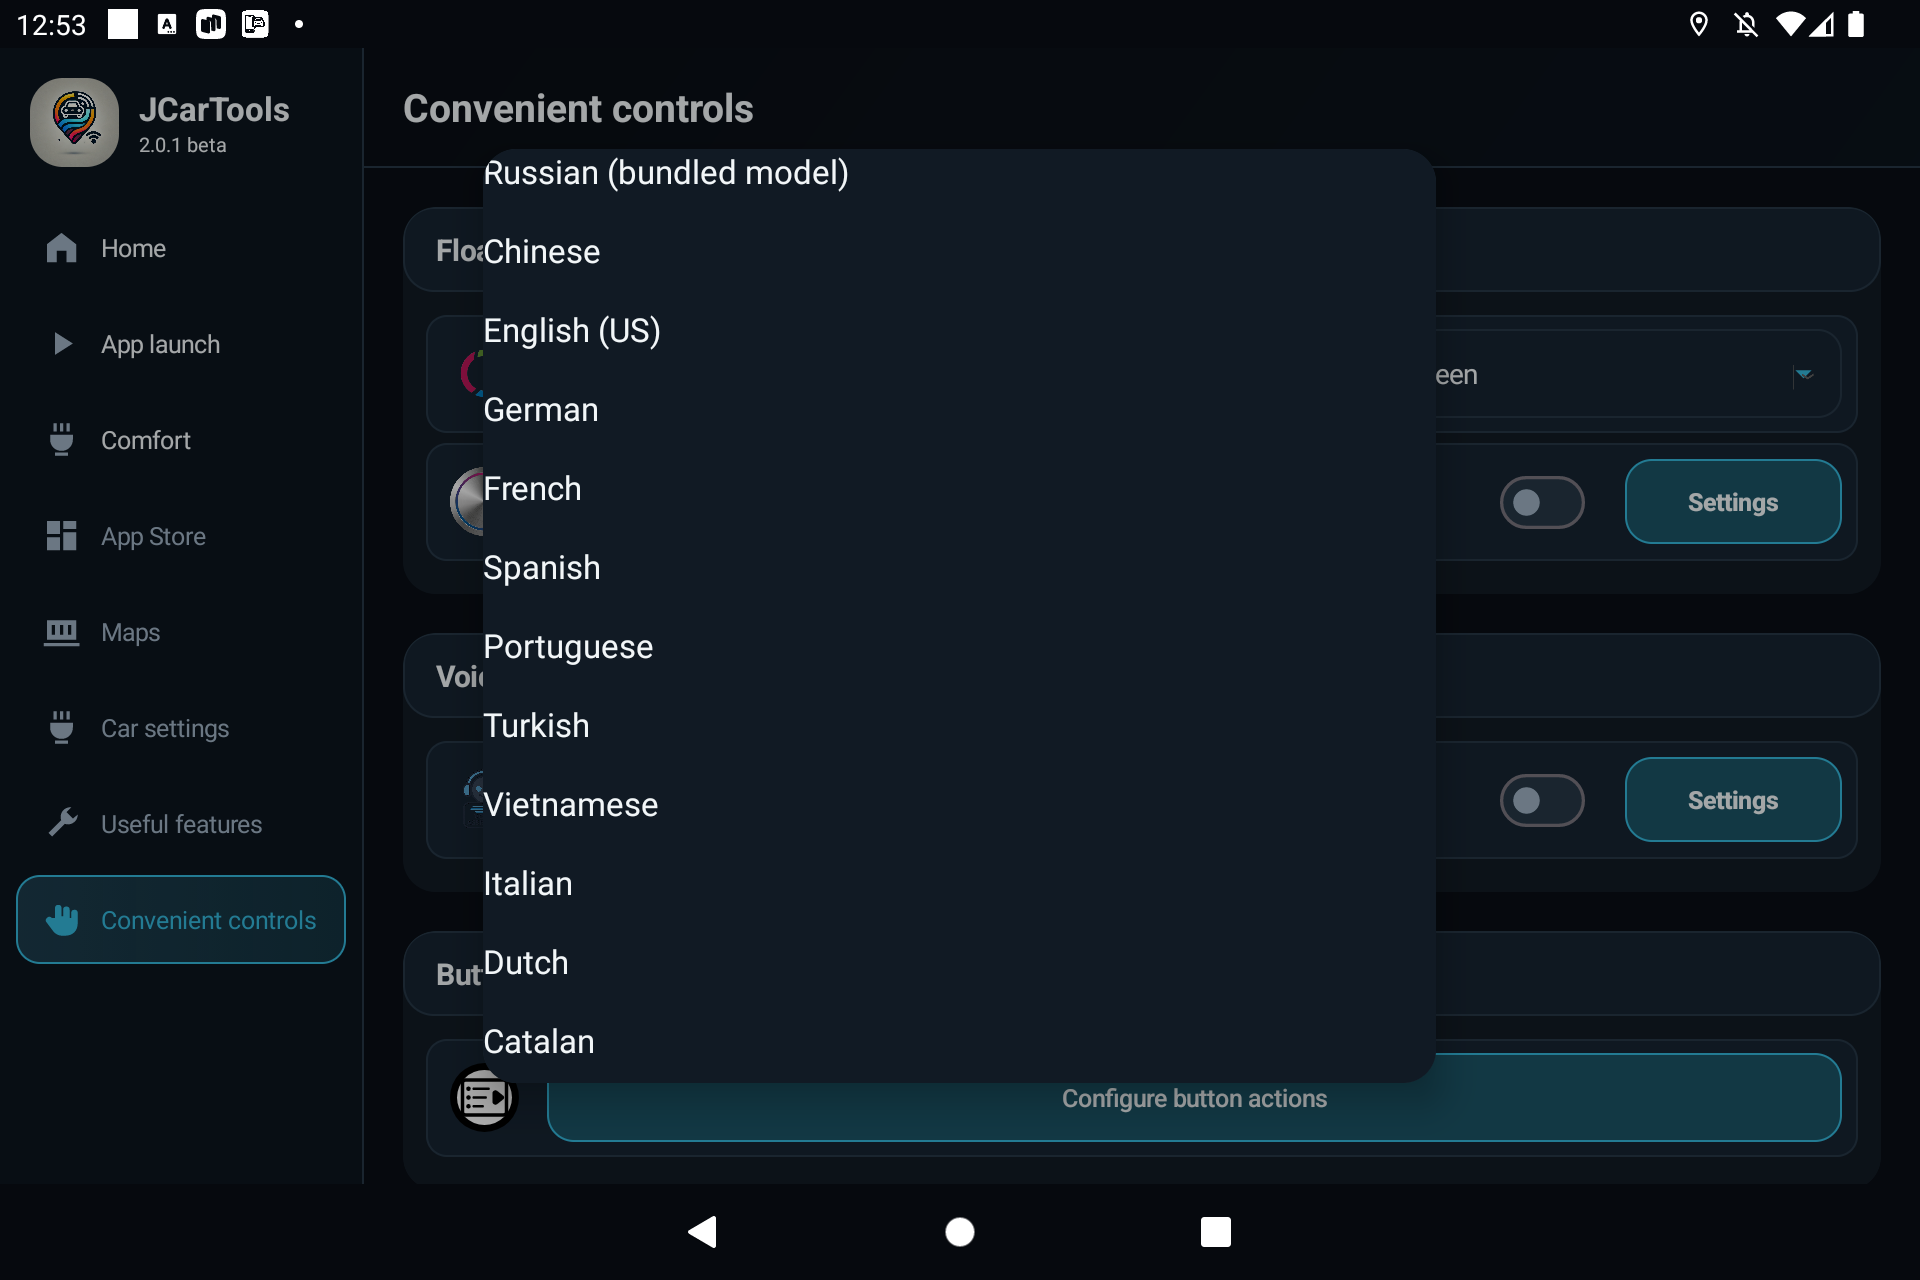
1. Select the recognition language
Open “Speech recognition language”, choose the required language model and select “Apply”. Another model may need to be installed before use. Only one recognition language is active at a time, so create every command in that language.
2. Choose how to activate the assistant
- Wake phrase. Leave widget activation disabled and enter a distinctive phrase of two or three words, such as “Hey, car” or “Hello, hey, car”. This helps reduce accidental activation by conversation or music.
- Manual activation through an action. Enable Activate the voice assistant by pressing the widget. Assign Activate voice assistant from the shared action list to a floating button, gesture, edge swipe or supported physical button. No wake phrase is needed in this mode.
3. Add your own voice command
This step is required in Simple mode: it defines the commands the assistant will perform. In Advanced mode, it is only needed for custom wording or clarification. For example, you could link “Time to go” to opening navigation.
- Select “Add command”.
- Enter a short phrase that is easy to pronounce consistently.
- Choose an action from the list.
- Leave the command enabled and select “Save”.
- Close the window and test the command while parked.
Write numbers as words in spoken phrases, and do not mix languages within one command set.
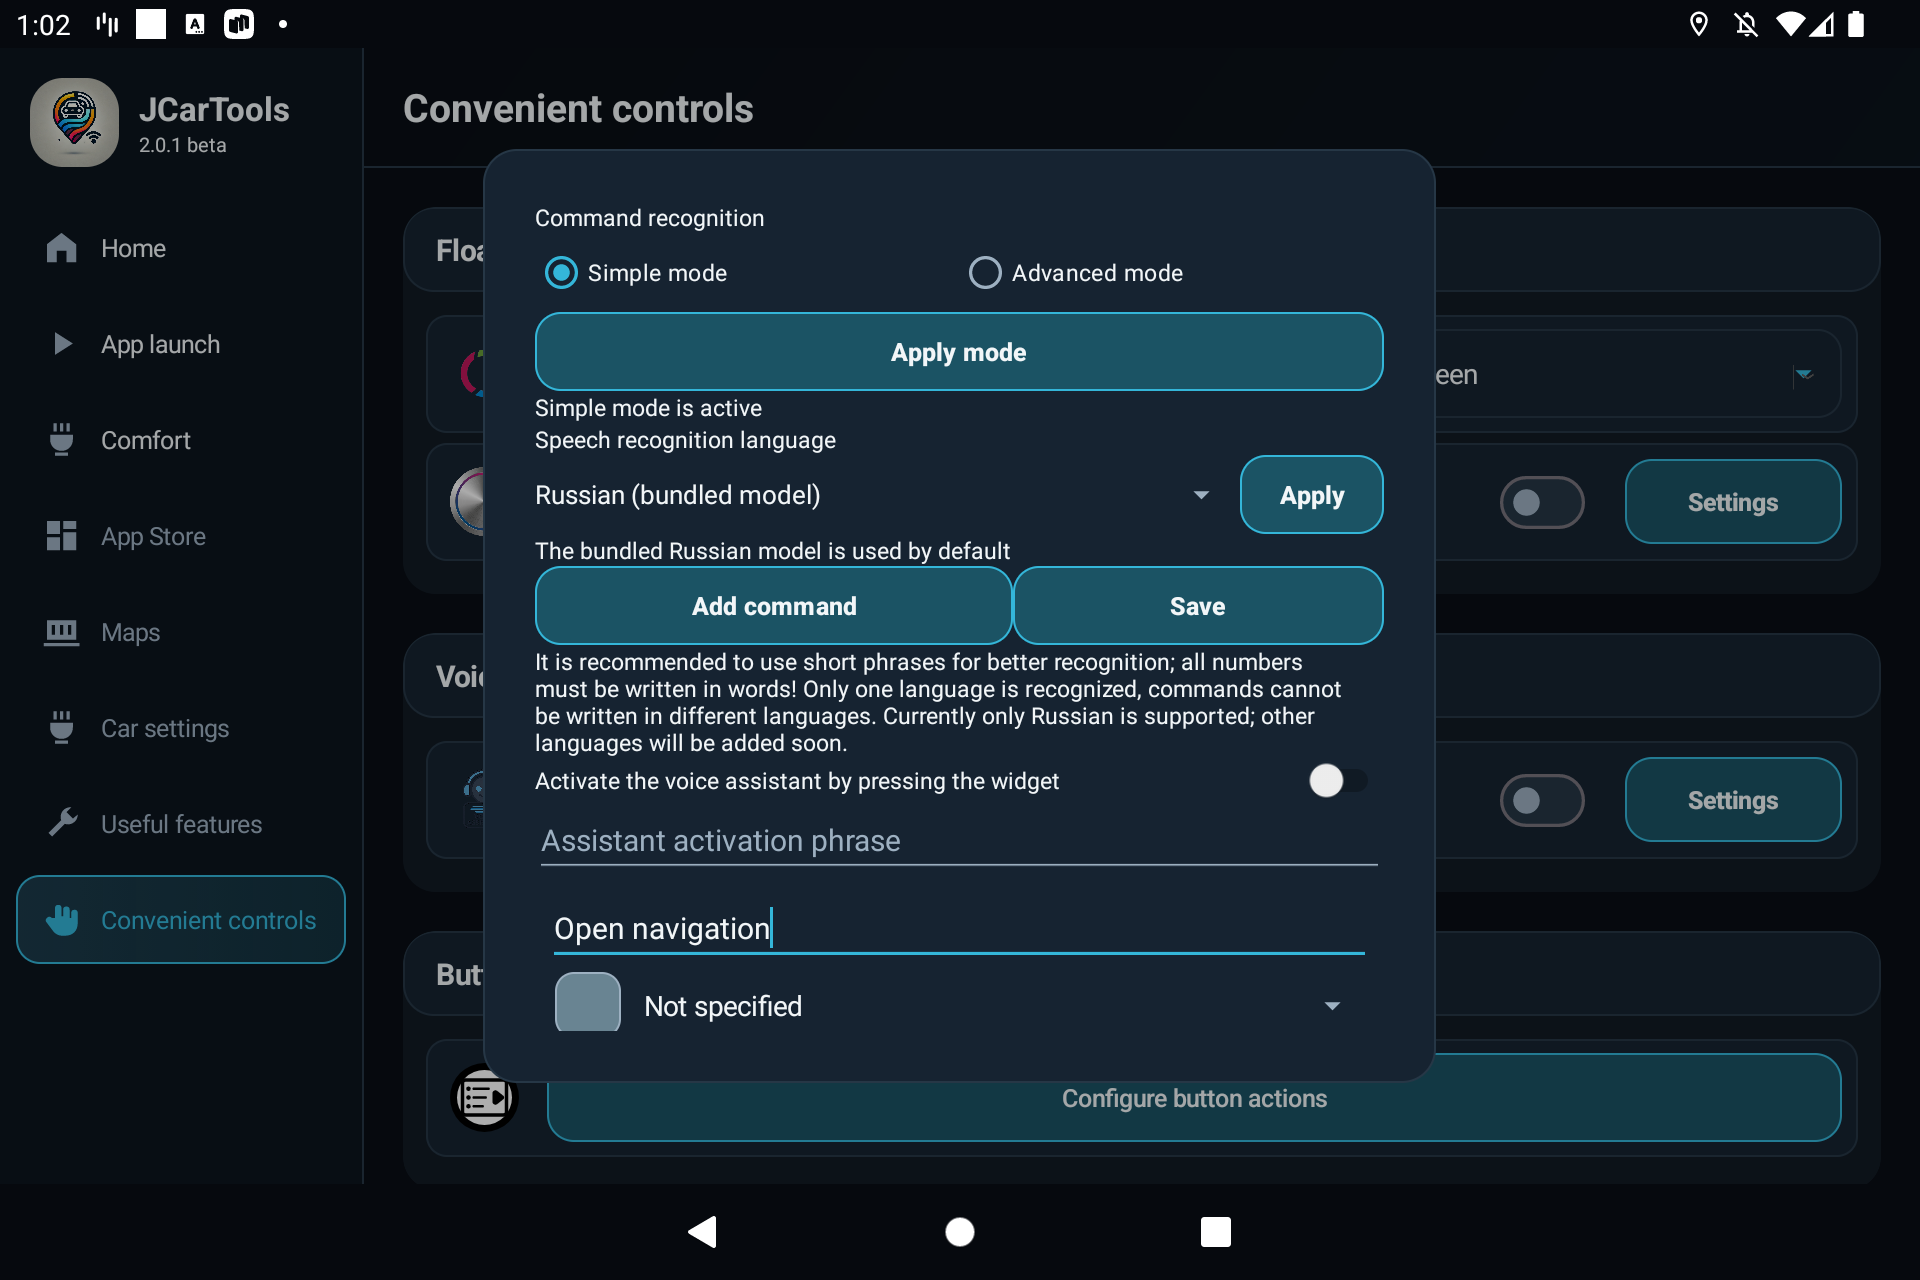
Example commands
- “Navigation on cluster” → display the selected app on the instrument cluster;
- “Open the sunshade” → open the supported sunshade;
- “Driver two” → select the corresponding driver profile;
- “Black screen” → start black-screen mode.
The available actions depend on the profile. If recognition is unreliable, shorten the phrase, remove similar commands and verify the selected language.
11. Final check
- The correct make-and-model profile is selected, and the available sections updated immediately.
- Navigation opens manually on the intended screen and closes correctly.
- Autostart has been tested with one app first.
- Widgets do not cover factory controls or warnings.
- Temperature-based automations do not conflict.
- Buttons, gestures and voice commands run only once per action.
- Settings remain saved after the vehicle is fully switched off and started again.
Frequently asked questions
Why does my vehicle show fewer options than the screenshots?
The guide uses the most feature-complete JAECOO profile. Available sections depend on the model, trim, head-unit firmware, selected profile, licence and permissions.
Can I select a similar vehicle profile to unlock more features?
No. Extra menu items do not mean the functions are compatible, and the wrong profile can cause incorrect operation. Select the exact or officially recommended profile.
Why is an app missing from the instrument-cluster list?
Check that the app is installed, has completed its first launch and has the required permissions. Then restart JCarTools and refresh the list.
What should I do if the interface behaves incorrectly after enabling an option?
Disable the most recently changed option, restart the head unit and verify the selected profile. This is why settings should be changed one at a time.